Creative website designs featuring appealing and interactive elements are highly popular in today’s design landscape. All because they help businesses create memorable and engaging experiences for users, making your brand stand out. However, there is a cost to it: such websites tend to suffer from poor performance unless they’re built very thoughtfully.
As a design and development agency, we often work on websites with bold visuals and creative layouts. Many of our customers are looking for eye-catching animations, 3D elements, and interactive experiences that help grab the user’s attention. Yet, it’s not always easy to balance visual storytelling with website speed and usability.
In this article, we’ll share how our team overcame this challenge on the recent client project. So, further, you will find our proven tips and tricks for creating rich visuals for a website while keeping it light and fast.
Customer’s Business Need
Our Client went through a rebranding phase and wanted their website to change accordingly. The goal was to craft more engaging website communication, which, in turn, involved adding interactive and sleek visual elements. Thus, they engaged our team to help bring their creative ideas to life. We created brand-new visuals for the Client’s website featuring 3D illustrations and animated sections. It was exactly what our Client was looking for, so we swiftly moved to development.
Since our client operated at a fast pace, we took an agile approach to the development process to keep up with their evolving needs. We decided to deploy the redesign on an environment as close as possible to the Client’s setup and alongside it, made sure that the new visuals won’t slow anything down. This involved a series of performance optimizations, and in the next chapter, we’ll break them down in detail.
Step-by-Step Performance Improvement
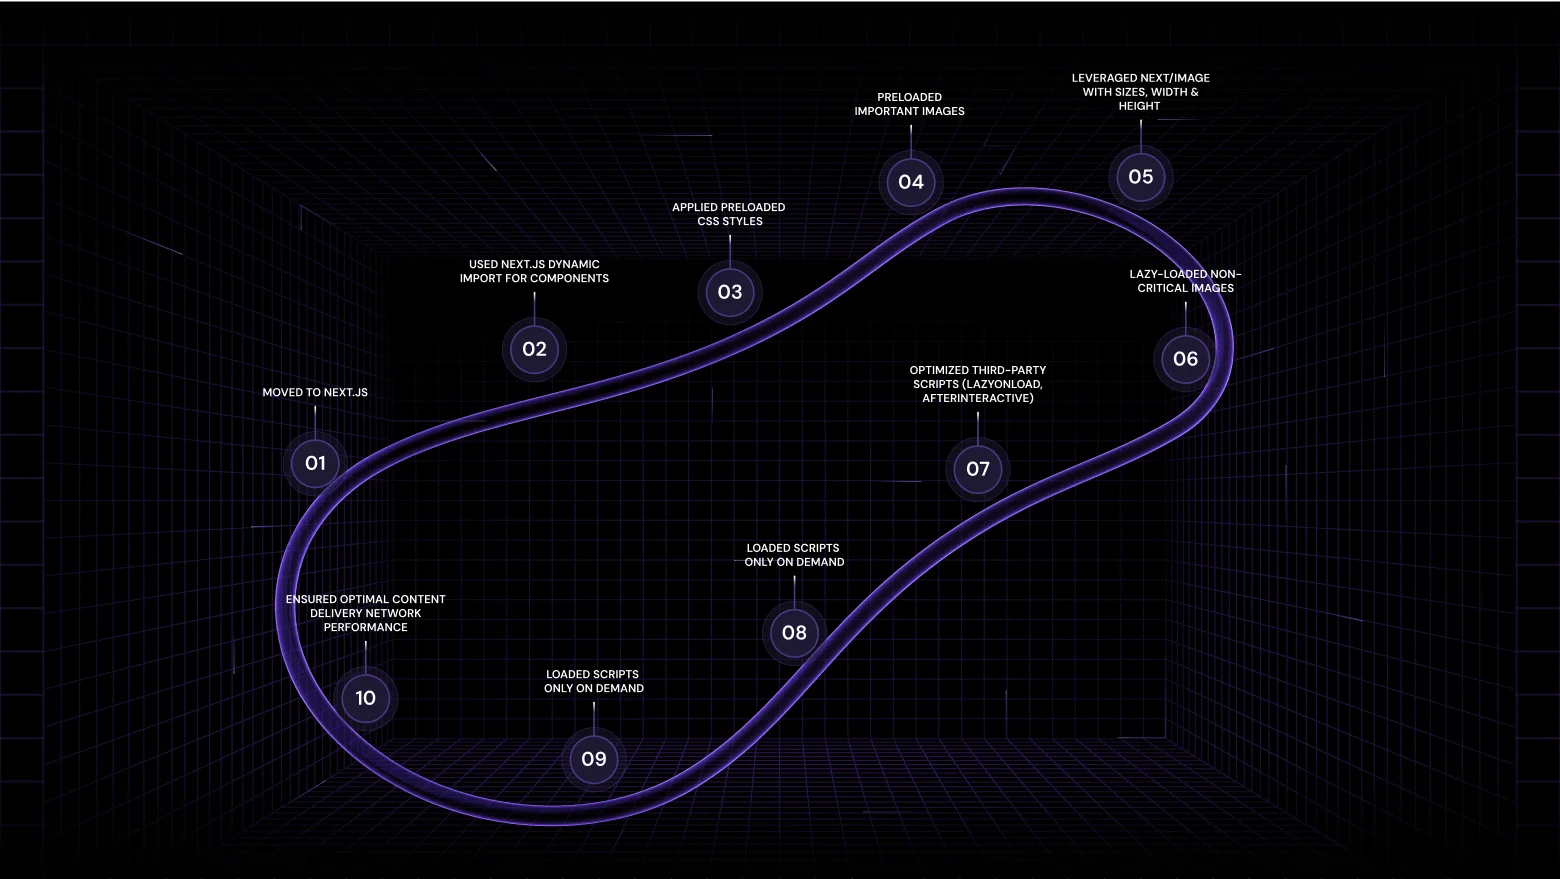
Our team started with a website technical review, outlining bottlenecks that might keep creative stuff from running smoothly. As the adjustments were needed across multiple areas, the improvements could not be made in a one step. Hence, we carefully planned our optimization process, dividing it into 10 phases to balance creativity and performance. Here’s a look at how the optimization went:
1. Moved to Next.js
The website was initially hosted on Vercel and built using Create React App (CRA). The issue was that CRA lacked advanced optimization features out of the box, so bundling everything client-side led to delays, especially during the initial load. We looked into some options to break through the bottleneck and decided to migrate to Next.js.
The migration gave us a significant benefit — a Server-Side Rendering (SSR). It allowed us to automatically split the code and render the main content on the server. This meant users got a complete HTML page right away, which significantly boosted our TBT (Total Blocking Time) and Largest Contentful Paint (LCP) metrics. Also, the migration to Next.js helped us control routing and configure static vs. dynamic pages more efficiently.
Result:
- 25% Boost in (LCP (Largest Contentful Paint) and TBT (Total Blocking Time) scores
- 90+ performance score in Google PageSpeed Insights, pushing the website into the green zone
Read More: Next.js Main Features
2. Used Next.js Dynamic Import for Components
As the original build shipped too much JavaScript up front, it blocked rendering and overwhelmed users’ browsers, especially on mobile. Thus, we decided to implement dynamic imports for secondary components, like sliders, tabs, and some interactive UI features. This broke the monolith down into smaller chunks, which loaded on demand when users started interacting with them.
Result:
- The website visitors got visual content faster and experienced less lag
- FCP (First Contentful Paint) and Interaction to Next Paint (INP) metrics boost
Example:
import dynamic from ‘next/dynamic’;

const HeavyComponent = dynamic(() => import(‘../components/HeavyComponent’), {
  ssr: false, // Avoids loading it server-side
  loading: () => <p>Loading…</p>,
});
3. Applied Preloaded CSS Styles
The page felt unstable. The elements shifted, text jumped, and nothing looked quite right at first glance. The delay came from the browser stalling on stylesheets while waiting for them to load before applying. This led to layout shifts, negatively impacting the overall user experience. Our solution to this was to preload the most important CSS components. This allowed us to make sure the styles were ready when the content appeared.
Result:
- Pages loaded faster and looked exactly as they should, right from the start
- CLS (Cumulative Layout Shift) and LCP (Largest Contentful Paint) metrics boost
Example:
<link rel="preload" href="/styles/main.css" as="style" />

If you import a global CSS file in _app.js, Next.js automatically includes it in the <head> and preloads it:
import '@/styles/globals.css';
Read More: Preloading Best Practices
4. Preloaded Important Images
First impressions matter, and our goal was to make the hero section load almost instantly. However, without images preloading, the browser didn’t prioritize the styles or visuals we wanted users to see first. Therefore, our team preloaded the key images to improve perceived speed. We also ensured that these assets had proper width and height set to avoid any layout shifts.
Result:
- Instant “wow” effect from the visuals at first sight
- LCP (Largest Contentful Paint) metrics boost
Example:
<link rel="preload" as="image" href="/hero-image.jpg" />

Or use next/image with priority attribute:
<Image
  src={heroImage}
  alt="Hero image"
  priority
/>
5. Leveraged next/image with Sizes, Width & Height
Since the images were initially loaded without compression, sizing, and optimization, it affected both performance and layout stability. After we moved to Next.js, we got a chance to improve the situation using its built-in next/image component. It allowed us to automatically resize images and define their dimensions up front to prevent visual instability.
Result:
- Stable layout without any unexpected shifts
- CLS (Cumulative Layout Shift) and LCP (Largest Contentful Paint) metrics boost
Example:
import Image from 'next/image';

<Image
  src="/hero.jpg"
  alt="Hero image"
  width={1200}
  height={600}
  sizes="(min-width: 768px) 50vw, 100vw"
  priority
/>
Read More: Next.js Image Optimization
6. Lazy-Loaded Non-Critical Images
Initially, images that hadn’t even been visible yet were loading with the rest of the core elements of the website. This tangibly slowed down the initial page load. Thus, we decided to apply a lazy-loading approach, making images appear only when a user scrolls to them.
Result:
- Streamlined load time and minimized the wasted data
- FCP (First Contentful Paint) and LCP (Largest Contentful Paint) metrics boost
Example:
Handled automatically with next/image, but can be controlled:

<Image src="/lazy-image.jpg" alt="Lazy Loaded Image" width={500} height={300} loading="lazy" />
7. Optimized Third-Party Scripts (lazyOnLoad, afterInteractive)
Some of the third-party scripts, like analytics tools and customer chat widgets, were loading before the main content. That was a big challenge as they blocked the main thread and delayed interactivity. Our experts deal with it by using the next/script API with strategy=”lazyOnload” or strategy=”afterInteractive”.
Result:
- The third-party scripts load only after they become usable, not before
- TBT (Total Blocking Time) and FID (First Input Delay) metrics boost
Example:
import Script from 'next/script';

<Script
  src="https://example.com/third-party.js"
  strategy="lazyOnload"
/>
Read More: Next.js Script Optimization
8. Loaded Scripts Only on Demand
Another challenge was with the heavy libraries on the website. And here, we speak about the booking calendar in particular. While being a valuable feature, the calendar wasn’t critical for the initial page load. So, our experts split the calendar and date picker into a lazily-loaded chunk. Now, it only appears when a user scrolls or interacts with the calendar.
Result:
- Ensured faster initial load and quicker browsing
- TBT (Total Blocking Time) metrics boost
Example:
const loadCalendar = () => {
  import('third-party-calendar').then((module) => {
  	module.initCalendar();
  });

  // inject scripts, css, etc
  // …
};

<button onClick={loadCalendar}>Open Booking Calendar</button>
Read More: Next.js Script Optimization

9. Optimized Resize Event Listeners
We noticed janky reflows and layout instability during orientation changes or window resizing on mobile. The root cause of it was in resizing events. Those were constantly firing and triggering frequent re-renders. Thus, our team decided to optimize the resize event listeners. So now, instead of running heavy code every time, we check if the screen size has actually changed. Only then would we run the code.
Result:
- Minimized reflows and excessive calculations
- INP (Interaction to Next Paint) metrics boost
Example:
useEffect(() => {
  const handleResize = () => {
    if (window.innerWidth !== prevWidth) {
      console.log("Resize needed");
    }
  };

  window.addEventListener("resize", handleResize);

  return () => window.removeEventListener("resize", handleResize);
}, []);
10. Ensured Optimal Content Delivery Network Performance
The final step in any website optimization pipeline is to check Content Delivery Network (CDN) performance. In our case, it was handled automatically, as Vercel provides this functionality right out of the box. However, if you made it this far, don’t forget to make sure your CDN is properly configured, whether manually or through your hosting provider.
Result:
- Faster page loads with assets delivered from the closest server
- Improved scalability as the CDN helps offload traffic from the origin server
Final Thoughts
The issue of low website performance in most cases cannot be solved in one go. Thus, our experts used a smart mix of technical optimizations that enhanced both the website speed and user experience. This helped us bring the initial design concept to life without sacrificing creativity at all.
%202.webp)

.webp)