
Every design project starts with uncertainty. Estimation doesn’t try to predict the future. It turns uncertainty into a plan by asking the right questions early enough to shape outcomes.
In the previous article, we explored why estimation matters, why it fails, and what influences accuracy. This article picks up where reality begins. It walks through the practical steps designers use to move from an early conversation to a clear, risk-aware estimate, one that reduces uncertainty, improves communication, and builds confidence on both sides.
Step 1 — Discovery: ask the right questions before you count hours
Before you estimate anything, be sure you understand what you’re estimating. Estimation starts with clarity, not with numbers.
Designing for a client often feels like a maze. Discovery is about mapping the maze before you start moving. It doesn’t eliminate complexity, but it prevents you from getting lost in it.

Why discovery matters (and why briefs rarely tell the whole story)
- “We need a landing page by the end of the month.”
- “Make our B2B dashboard more intuitive.”
- “We’re rebranding and want the app to feel premium.”
- “I need a couple of screens for my app.”
Each sounds simple until you unpack it. Behind every short ask are assumptions, dependencies, and expectations that change the work. Discovery surfaces those early. Before you talk about time or cost, you need to understand the why and the what behind the request.
Essential discovery questions
The purpose of discovery is not to collect perfect answers. It’s to turn a vague request into a usable brief and to make uncertainty visible.
Some essential questions include:
- Business goals: what problem are we solving and how will success be measured?
- Users: who are we designing for and what do they need to accomplish?
- Scope: what is in and what is out?
- Constraints: brand, platform, accessibility, or technical limits?
- Dependencies: who provides content, data, or approvals and when?
- Stakeholders: who decides, who reviews, who just needs to be informed?
- Timeline and accuracy: what is the latest acceptable delivery date? Any hard deadlines?
- Implementation and handoff: who will build this and how will handoff work?
You do not need perfect answers. The goal is a mindmap of what is known, what is assumed, and what is unknown.
Ask smarter, not more
One of the most important skills in discovery is how you ask.
It’s tempting to send a long list of questions and hope clarity emerges. But not all questions are equal. Too many open-ended questions can slow things down or make stakeholders feel unsure of themselves.
Use framed, low-friction questions that make it easy to answer.
For example,
instead of “What level of accessibility do you need?”
try: “ For government work, WCAG AA is common. Would that work for your users, or do you need stricter compliance?”That invites a simple yes or no and keeps momentum.
Now the client can simply confirm or correct, without feeling like they need to be an expert. Momentum stays intact.
With experience, you will correctly anticipate likely answers i n 70 to 80 percent of projects. That is not guessing. It is pattern-based judgment that helps you lead the conversation and gain trust early. When requirements are huge (100+ pages)
Large requirement documents look authoritative, but they often hide the same uncertainty as short requests, just spread across more pages.
Don’t read them line by line. Start with a quick skim to understand intent and structure. Then map only what drives design effort: core flows, edge cases, integrations, non-functional requirements, and constraints.
Read for effort drivers, not completeness.
Focus on complexity signals such as multiple user roles, state-heavy screens, conditional logic, responsiveness, localization, accessibility, and customization.
Vague words like “intuitive”, “premium”, or “user-friendly” usually mean hidden design work.
AI can help as a first pass to summarize or extract UX-related sections, but designers should always validate critical flows themselves. Split the reading across the team and ask each reviewer to return only risks, assumptions, and open questions.
Log these early and validate them fast. The goal is not to read every page. It is to surface uncertainty before it turns into rework or scope creep.
Classify the project early
Knowing the category helps you focus on the right questions:
- Marketing website: focus on visual quality and responsiveness. Hidden work: content prep, asset optimization, CMS integration, accessibility.
- Web app: focus on flows and interactions. Hidden work: edge cases, user roles, microcopy, review cycles, documentation.
Classification gives you the right estimation lens before you commit to numbers.
A one-hour ritual that pays off
Before every estimate, run this simple ritual. It takes one hour and saves far more later.
First 30 minutes, solo: list what you know, what you assume, and what you do not understand. Don’t polish it. The value is spotting the blanks.
Next 30 minutes, team sync:walk the lists together and end with a confidence check: “On a scale of 1 to 5, how confident are we that we know what we’re building?” If below 4, wait to estimate. You need more clarity.
If confidence is high, decide the needed precision (ROM, ballpark, or detailed) and pick your approach.
Practical discovery tips
- Watch for silent work such as accessibility, localization, animations, and QA. These get missed and add up.
- Separate wants from needs. Clarify what must be in the first release and what can wait.
- Know the team and stakeholders. More people or less design maturity lengthen review cycles.
- Capture early artifacts. Even rough requirement notes or a simple backlog draft help you see dependencies. Good designers do not wait for perfect clarity; they create it.
Step 2 — Scoping & Measuring
Once discovery gives you a clearer picture, the work stops being abstract. You now understand what the project is about, but understanding alone is not enough. The next challenge is turning that clarity into something you can measure.
This is where many teams rush. They move straight from “we get it” to “here’s the number.” But estimation accuracy does not come from confidence. It comes from structure. Without structure, even the best understanding collapses under pressure later.
Most design projects, no matter the size, go through a familiar set of phases:
- Project Setup
- Discovery & Research
- Information Architecture (IA) & UX
- Visual Design
- Prototyping & Testing
- Handoff & Delivery
This sequence forces you to think beyond final screens. It reminds you that design effort accumulates across decisions, iterations, reviews, and delivery, not just what ends up in Figma.
Breaking the Work Down: Creating a WBS
To estimate properly, you need to break the project into clear, manageable parts. This is what the Work Breakdown Structure does. It turns a large, fuzzy scope into a visible hierarchy, from major deliverables down to concrete tasks.
.jpg)
Start by listing the deliverables you’ll actually hand over. Then connect each deliverable to the relevant phases, and break it into tasks (and subtasks when needed).
A straightforward rule:
- Deliverables = the things you can show or hand over
- Tasks = the actions required to create them
If you can hand it over, it’s a deliverable. If not, it’s a task under that deliverable.
Different projects benefit from different groupings. Choose what best reflects how effort will be spent:
- By Pages — good for marketing sites
- By Flows — helpful for apps with complex user journeys
- By Features — useful for product or platform development
You can mix these approaches when needed. The goal is not purity. It is clarity.
Tips for a Useful WBS
A good WBS is easy to scan and easy to discuss.
- Make it visual. Use a tree or outline format so you can see the hierarchy.
- Write deliverables as outcomes. Use “Wireframes,” rather than “Work on wireframes.”
- Stay at the right level of detail. Tasks should be small enough to estimate but big enough to matter.
- Draft first, refine with the client or team.
That last step matters more than it sounds. Building the WBS collaboratively aligns expectations early and exposes gaps before they turn into change requests.
A clear WBS surfaces hidden work early, like review rounds, accessibility needs, and documentation, so nothing gets missed. It is not paperwork; it is a shared understanding tool.
And it is not just a BA responsibility. Strong teams let designers and BAs overlap: designers understand workflows and edge cases, while BAs clarify data and logic. Together, they build a more realistic, accountable plan that supports delivery.
Turning Structure into Effort: Using Design Points and PERT
Once your WBS is in place, you can start assigning effort. This is where your estimation method comes in. In our practice, we use a hybrid approach: Design Points paired with PERT. It works well because it balances creative judgment with structured analysis.
Without measuring complexity, two screens can look the same, but one might take five times longer to design. Design Points make these hidden differences visible. They help you see the project not just as deliverables, but as a network of effort drivers.
These drivers fall into three dimensions:
Technical Factors: What makes the system harder to design: integrations, responsive states, animations, accessibility, and data visuals. More moving pieces mean more complexity.
Environmental Factors: The conditions you work in: design maturity, number of stakeholders, review speed, tools, communication, and team experience.
System Actors: Who and what interacts with the design, and how many touchpoints you need to support.
Together, these dimensions turn abstract complexity into something you can measure before you even open Figma.
Then PERT adds probability. Instead of assuming ideal conditions, PERT calculates a weighted average that reflects how real projects behave: dependencies shift, feedback loops stretch time, and teams learn as they go. Design work rarely follows a straight line, and PERT acknowledges that curve.
Combined with Design Points, this creates a model that works especially well early in a project, when not everything is known yet. You may not have all the answers, but you can see how many unknowns exist and how strongly they influence effort.
You can see the full example in the next article.
Why the Hybrid Works
Early in a project, you rarely know every answer. But you can understand how many unknowns you have and how they might influence effort. That’s why combining Design Points and PERT works well:
- It captures technical and human dependencies early.
- It reflects real design work — exploration, iteration, and review cycles.
- It produces a range, not a rigid single number.
- It makes uncertainty visible instead of hiding it.
This method isn’t about predicting exact hours. It’s about modeling how the project could behave across different scenarios. The result is an estimate that’s grounded, flexible, and easier to defend.
Step 3 — Making Assumptions Clear & Managing Risks
Good estimates don’t remove uncertainty; they make it visible.
By now, you have mapped the project, broken it into parts, and assigned effort. On paper, the estimate may already look solid. But this is the point where many estimates quietly become fragile. What separates a stable estimate from one that collapses later is not better math, but whether the assumptions holding it together are made visible.
Every estimate is based on things you believe to be true.
When those beliefs stay unspoken, they become weak points.
Why Assumptions Matter
Assumptions are the quiet conditions that keep your timeline intact:
- content will arrive when needed
- a design system is ready to be reused
- review cycles won’t stretch too far
When an assumption breaks, it instantly becomes a risk. So instead of hoping everything goes smoothly, you move these expectations into the open. You write them down and plan around them. That’s how trust is built, not by promising certainty, but by showing how you’ll handle the lack of it.
A common mistake is using assumptions as a shield, something like:
“We assume the client will provide content on time.”
On the surface, this sounds neutral. In practice, it can feel defensive, as if responsibility is being shifted in advance.
A stronger assumption does the opposite. It shares responsibility and shows foresight:
“Because content delivery depends on the client team, we’ve aligned our schedule assuming materials arrive one week before design begins. If delays happen, we’ll adjust by parallelizing layout work and content integration.”
The difference is subtle but important. The second version acknowledges interdependence and offers a plan. Clients do not expect you to control everything. They expect you to think ahead. Assumptions that build trust frame uncertainty as collaboration, not blame.
Attaching Assumptions to the WBS
The easiest way to manage uncertainty is to connect it directly to your Work Breakdown Structure. For each WBS block, list:
- Assumptions — what we expect
- Risks — what happens if we’re wrong
- Mitigation — what we’ll do if it happens
This turns the WBS from a static outline into a working model of confidence and flexibility.
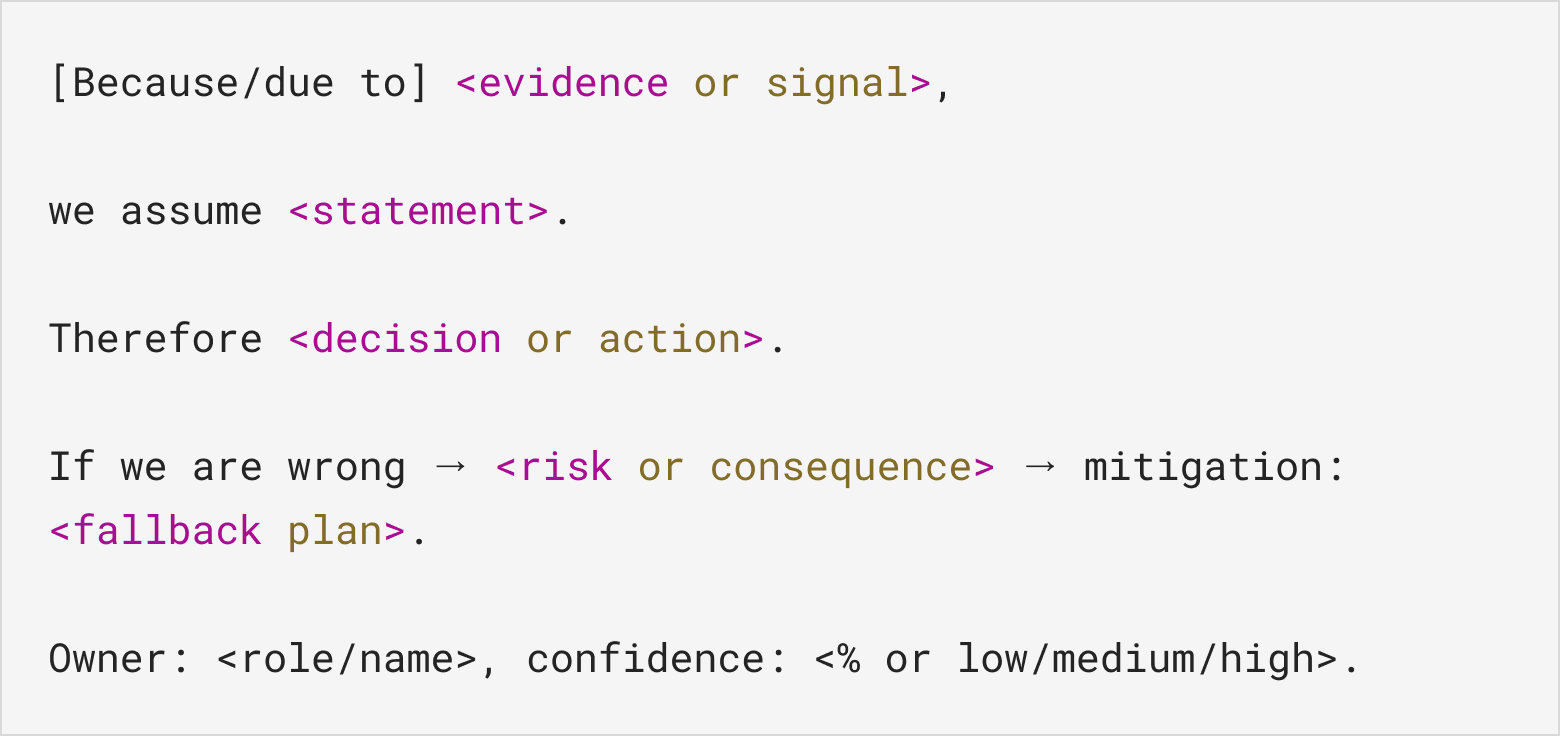
A simple structure keeps everything consistent:
Formula
Example
.png)
This formula forces clarity. It shows your reasoning, your fallback, and when you’ll know if you’re right.
Scoring and Quantifying Risk
Once you have your assumptions and risks, turn them into measurable data. For each WBS phase or block, score the risks on two axes:
.jpg)
Then calculate:
Risk Exposure = Probability × Impact
This metric shows where uncertainty clusters. High-exposure items may need stronger mitigation or a larger buffer.
Finally, translate exposure into a buffer percentage for that WBS block. The buffer is no longer guesswork. It reflects measured risk.
This step builds:
- Transparency — stakeholders see the reasoning behind the estimate
- Alignment — teams know which areas need attention
- Resilience — buffers are purposeful, not hidden padding
Confidence comes from showing what you don’t know and how you’ll respond.
Why This Works for Clients
Making assumptions and risks explicit is not just a team exercise. It directly improves the client experience.
It reduces surprises. When dependencies and risks are visible from the start, changes later feel expected, not alarming. Adjustments become part of the plan, not a crisis.
It makes approval easier. Clients are not asked to trust a number in isolation. They can see how it was built, what it depends on, and what might influence it, which makes decisions faster and more confident.
It makes approval easier. Clients are not asked to trust a number in isolation. They can see how it was built, what it depends on, and what might influence it, which makes decisions faster and more confident.
It leads to healthier budget conversations. Buffers are no longer hidden padding. They are clearly tied to specific risks, which allows clients to trade scope, timing, or risk consciously instead of reacting under pressure.
For clients, this turns estimation from a leap of faith into a shared plan.
Final thoughts
At this point, your estimate is more than a spreadsheet. It explains itself.
- Step 1: Discovery You clarified goals, constraints, team maturity, and unknowns. You defined the project category and gathered the information needed to anchor the estimate.
- Step 2: Scoping & Measuring You built a WBS, outlined deliverables and tasks, and applied Design Points + PERT to turn complexity and context into realistic effort.
- Step 3: Assumptions & Risks You made your assumptions explicit, identified risks, assigned owners, scored exposure, and added buffers based on data, not guesswork.
When these three parts work together, the estimate becomes a shared plan rather than a defensive document. Clients do not just receive a number; they understand how it was formed, what it includes, and how the team will adjust when real conditions shift.